こんにちは。もーすけです。
今回はKubeletのログ管理について調べたことを残します。
Kubernetesにおけるログ管理については以前もブログを書いてきましたが、どちらかというとアプリ目線でのことで、実際のところKubeletがどうログ管理しているかよくわかっていなかったので調査してみました。
きっかけは、KubernetesのPodのログはローテートされるのか?ずっと標準出力にログを吐き続けたらストレージはどうなるのか?そのあたり気になったことです。
kubeletのログ管理
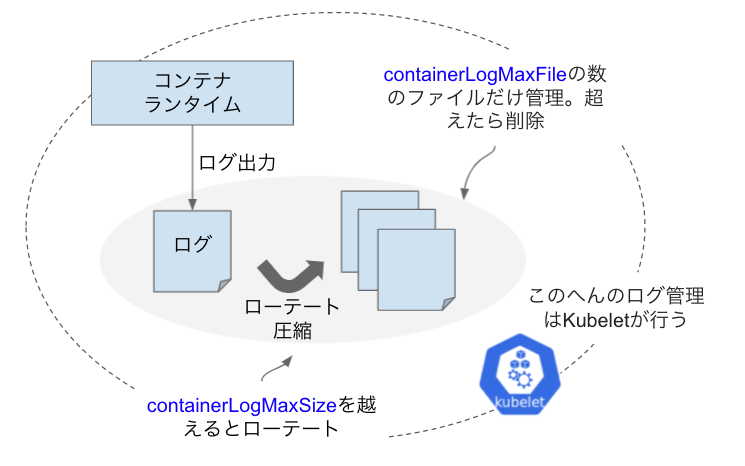
Kubeletは、さまざまな機能を持ちますが、その代表的なものが「Podを起動、管理すること」です。 その管理プロセスには、ログ管理も含まれています。ざっとKubeletのログ管理の全体像を示してみます。 (Kubeletの全体像を把握しているわけではないので、かなり限定的なスコープになっているかもしれません)
Kubeletの設定オプションの中に、コンテナのログに関するところは2つあります。 (参考リンク: kubeletConfiguration)
containerLogMaxSize- コンテナが出力したログファイルの最大サイズ。(デフォルト: 10Mi)
- 最大サイズを越えると、Kubeletがログをローテーション。
containerLogMaxFiles- ローテーションされたファイルをいくつ保持するかの設定。(デフォルト: 5)
- この値は必ず2以上。

実験!見た目上の動きを確認
検証環境
次の環境で検証しました。
- Kubernetes 1.21 (OpenShift 4.8)
- containerLogMaxSize: 5MB
- containerLogMaxFiles: 5
実験
実験用に、ログを大量に出力するコンテナを準備します。
今回は以下を用いました。ループで"RandomString"を出力するだけのコンテナです。
#logtest.yaml
apiVersion: apps/v1
kind: Deployment
metadata:
  labels:
    app: debug
  name: debug
spec:
  replicas: 1
  selector:
    matchLabels:
      app: debug
  template:
    metadata:
      labels:
        app: debug
    spec:
      containers:
        - image: registry.gitlab.com/mosuke5/debug-container:latest
          name: debug
          args: ["sh", "-c", "i=1; while [ $i -le 10000 ]; do j=1; while [ $j -le 2000 ]; do echo RandomStringRandomStringRandomStringRandomStringRandomStringRandomStringRandomStringRandomStringRandomStringRandomStringRandomStringRandomStringRandomStringRandomStringRandomStringRandomStringRandomStringRandomStringRandomStringRandomStringRandomStringRandomStringRandomStringRandomStringRandomStringRandomStringRandomStringRandomStringRandomStringRandomStringRandomStringRandomString; j=$(( j+1 )); done; sleep 1; i=$(( i+1 )); done"]
デプロイし、Podがスケジュールされたノード名を確認します。
ip-10-0-166-31.ap-southeast-1.compute.internalでPodが動作していることが確認できました。後ほどノードにアクセスしてログファイルを確認します。
% kubectl apply -f logtest.yaml
deployment.apps/debug created

% kubectl get pod -w -o wide
NAME                     READY   STATUS              RESTARTS   AGE   IP       NODE                                             NOMINATED NODE   READINESS GATES
debug-5cf4c8b545-jxx65   0/1     ContainerCreating   0          25s   <none>   ip-10-0-166-31.ap-southeast-1.compute.internal   <none>           <none>
debug-5cf4c8b545-jxx65   1/1     Running             0          38s   10.128.2.10   ip-10-0-166-31.ap-southeast-1.compute.internal   <none>           <none>

% kubectl logs -f debug-5cf4c8b545-jxx65
RandomStringRandomStringRandomStringRandomString...
では、ノードにアクセスしてファイルを確認します。
Podのログは/var/log/pods/xxxに配置されています。
ls -lhを何度か打って、状況を確認しましょう。後ほど動画も掲載します。
以下ノード内
sh-4.4# cd /var/log/pods/default_debug-5cf4c8b545-jxx65_eef7dd8e-5df1-4861-920c-90fd8788b8f9/debug
sh-4.4# pwd
/var/log/pods/default_debug-5cf4c8b545-jxx65_eef7dd8e-5df1-4861-920c-90fd8788b8f9/debug

sh-4.4# ls -lh
total 8.7M
-rw-------. 1 root root 840K Sep  9 04:33 0.log
-rw-r--r--. 1 root root 125K Sep  9 04:33 0.log.20210909-043310.gz
-rw-r--r--. 1 root root 124K Sep  9 04:33 0.log.20210909-043320.gz
-rw-r--r--. 1 root root 127K Sep  9 04:33 0.log.20210909-043330.gz
-rw-------. 1 root root 7.4M Sep  9 04:33 0.log.20210909-043340

sh-4.4# ls -lh
total 24M
-rw-------. 1 root root 8.3M Sep  9 04:33 0.log
-rw-r--r--. 1 root root 124K Sep  9 04:33 0.log.20210909-043320.gz
-rw-r--r--. 1 root root 127K Sep  9 04:33 0.log.20210909-043330.gz
-rw-------. 1 root root 7.4M Sep  9 04:33 0.log.20210909-043340
-rw-r--r--. 1 root root  35K Sep  9 04:33 0.log.20210909-043340.tmp

sh-4.4# ls -lh
total 13M
-rw-------. 1 root root 3.3M Sep  9 04:33 0.log
-rw-r--r--. 1 root root 124K Sep  9 04:33 0.log.20210909-043320.gz
-rw-r--r--. 1 root root 127K Sep  9 04:33 0.log.20210909-043330.gz
-rw-r--r--. 1 root root 113K Sep  9 04:33 0.log.20210909-043340.gz
-rw-------. 1 root root 8.3M Sep  9 04:33 0.log.20210909-043351

sh-4.4# ls -lh
total 17M
-rw-------. 1 root root 5.8M Sep  9 04:33 0.log
-rw-r--r--. 1 root root 124K Sep  9 04:33 0.log.20210909-043320.gz
-rw-r--r--. 1 root root 127K Sep  9 04:33 0.log.20210909-043330.gz
-rw-r--r--. 1 root root 113K Sep  9 04:33 0.log.20210909-043340.gz
-rw-------. 1 root root 8.3M Sep  9 04:33 0.log.20210909-043351
どうやら見た目上は次のように動いているようです。
- コンテナは
0.logにログを書き込む - 一番古いログファイルを削除するを削除する(
containerLogMaxFilesを超える場合) 0.logが5MB(containerLogMaxSize)を越えると、ひとつ前のログを圧縮する0.logにタイムスタンプを付けてログローテートする- コンテナは
0.logに書き込み続ける
Kubeletのソースコードを確認
動作を見た目上確認してみましたが、いちおうKubeletのソースコードを簡単に追ってみようと思います。 ソースコードは、難しくなく概ね予想通りでありました。
まず、Kubeletのログ管理ですが、10秒間隔(logMonitorPeriod = 10 * time.Second)で動作していることを確認できます。ファイルに付けられたタイムスタンプがきれいに10秒おきになっているのが理解できます。(該当ソースコード)
ループで実行しているのはrotateLogs()になります。
const (
	// logMonitorPeriod is the period container log manager monitors
	// container logs and performs log rotation.
	logMonitorPeriod = 10 * time.Second
	// timestampFormat is format of the timestamp suffix for rotated log.
	// See https://golang.org/pkg/time/#Time.Format.
	timestampFormat = "20060102-150405"
	// compressSuffix is the suffix for compressed log.
	compressSuffix = ".gz"
	// tmpSuffix is the suffix for temporary file.
	tmpSuffix = ".tmp"
)

//...

// Start the container log manager.
func (c *containerLogManager) Start() {
	// Start a goroutine periodically does container log rotation.
	go wait.Forever(func() {
		if err := c.rotateLogs(); err != nil {
			klog.ErrorS(err, "Failed to rotate container logs")
		}
	}, logMonitorPeriod)
}
rotateLogs()を見てみましょう。
c.policy.MaxSize が containerLogMaxSize の値になりますが、ログファイルのサイズがそれ以上だった場合に rotateLog() を実行しているようです。(該当ソースコード)
func (c *containerLogManager) rotateLogs() error {

    //...

		if info.Size() < c.policy.MaxSize {
			continue
		}
		// Perform log rotation.
		if err := c.rotateLog(id, path); err != nil {
			klog.ErrorS(err, "Failed to rotate log for container", "path", path, "containerID", id)
			continue
		}
rotateLog()を見ると、大きく4つの処理で動いています。(該当ソースコード)
cleanupUnusedLogs()- 一時ファイルや前回にログローテートで失敗して残ってしまったファイルなど削除
removeExcessLogs()containerLogMaxFilesを超える場合にファイルを削除
compressLog()- ファイルの圧縮
rotateLatestLog()- 最新ログファイルのローテート
func (c *containerLogManager) rotateLog(id, log string) error {
	// pattern is used to match all rotated files.
	pattern := fmt.Sprintf("%s.*", log)
	logs, err := filepath.Glob(pattern)
	if err != nil {
		return fmt.Errorf("failed to list all log files with pattern %q: %v", pattern, err)
	}

	logs, err = c.cleanupUnusedLogs(logs)
	if err != nil {
		return fmt.Errorf("failed to cleanup logs: %v", err)
	}

	logs, err = c.removeExcessLogs(logs)
	if err != nil {
		return fmt.Errorf("failed to remove excess logs: %v", err)
	}

	// Compress uncompressed log files.
	for _, l := range logs {
		if strings.HasSuffix(l, compressSuffix) {
			continue
		}
		if err := c.compressLog(l); err != nil {
			return fmt.Errorf("failed to compress log %q: %v", l, err)
		}
	}

	if err := c.rotateLatestLog(id, log); err != nil {
		return fmt.Errorf("failed to rotate log %q: %v", log, err)
	}

	return nil
}
OpenShiftユーザ向け
OpenShiftを使っている人は、Kubeletの設定はKubeletConfigリソースを用いてKubeletの設定を書き変えられます。今回は次の設定を投入しました。KubeletConfigを追加すると、MachineConfigOperatorが各ノードに設定を配置してくれます。
apiVersion: machineconfiguration.openshift.io/v1
kind: KubeletConfig
metadata:
  name: set-my-conf
spec:
  machineConfigPoolSelector:
    matchLabels:
      pools.operator.machineconfiguration.openshift.io/worker: ''
  kubeletConfig:
    maxPods: 500
    containerLogMaxSize: 5Mi
さいごに
今回は、Kubeletのログ管理について確認していきました。 ソースコードも今回の箇所は非常にわかりやすく、見かけ上の動作を超えて処理を確認できたいい体験でした。今後も積極的にソースコードも可能な限り確認していきたい思いです。
